Posted in Couture Sewing, Little Black (French) Jacket

Finishing my Little French Jacket: Making it my own with buttons and pockets

The day has finally arrived…I have finished my third Little French Jacket and I am now excited to find places to wear it!

DSC01271
Oh how I loved the alpacas…and their wool! More about that in an upcoming post.

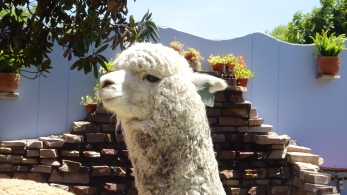
We just returned from a wonderful four-week vacation that saw us taking a ship through the Panama Canal and spending a few weeks tooling along the west coast of South America, spending a week in Peru and just over a week in Chile. That meant that I had to put my couture sewing work on hold for a while, but there are two very good outcomes from this. First, I am very excited to have returned and to see my LFJ with fresh eyes. In addition, I learned all about alpaca wool fabric and sweaters so will share that insight eventually. But now, here’s how I finished that jacket.

When last I posted, I had finished the sleeves along with their trim and hand-finished the silk charmeuse lining. What is left at this stage is the really creative, fun part: making it my own with buttons and pockets.

I ordered a selection of buttons from China (perhaps not the best idea I’ve ever had) but the quality was not exactly as I might have hoped. However, they’ll be great for smaller projects. They were also very late arriving so in my impatience, I headed down to Queen Street West here in Toronto to a favourite spot for button selection (Neveren’s Sewing Supplies) and spent a bit of quality time rummaging through hundreds of styles. I came home with another selection then set about determining the look I was going for.

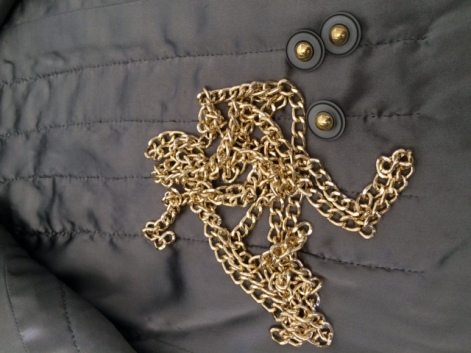
In the end, I decided that the buttons should make a subtle statement reflecting the gold chain that I would be stitching along the hem line in due course.

IMG_1395

But first, I have to tell you about the debacle of the buttonholes.

Way back at the beginning of this process I made a decision to go with hand-worked buttonholes, a process that I would have to learn since I’ve never done them before. Well, that didn’t work out so well, so I did some tests of machine buttonholes on the fabric and lining and was satisfied. However, when the time came to actually complete those buttonholes, I realized that I had not taken into consideration the bulk of the seam allowance when I did those samples. It simply was not going to work. I was now in a real pickle. It was too late to do the faux-welts on the interior, the technique that Claire Schaeffer recommends in both this pattern (Vogue 8804) Vogue 8804 pattern frontand in her book, so what to do? I was left only one choice: doing hand-worked buttonholes through both the fabric and lining, an approach that you do, indeed sometimes see in couture garments, but that when done by an amateur can look dreadful. I would have to spend some time learning. So, I made up some samples and start the process. It took me two weeks.

According to the Yorkshire Tailor whose video I shared in an earlier post, you have to do about 30 such buttonholes before you get it right. He has a point. For the first six that I did (using waxed button twist) I made a variety of mistakes. On each occasion I corrected that mistake for the next one until I finally thought I had corrected them all. After about a dozen samples, I decided they were all right so I started with the sleeves. They were okay, but not terrific. The truth is, however, that the thread matches so well that you can hardly see the buttonholes at all anyway. Then it was on to the front.

I took a deep breath and began. The scary part is after the initial preparation of the spot by hand-basting around it to ensure stability while sewing when you have to cut the hole open. At that point there is no going back. It’s not like machine button holes where you cut them after they’re completed. No, these ones have to be cut before you begin since the whole point of them is that the edges are completely covered by the stitches thereby avoiding any of those little strings that can be such a problem in machine buttonholes.

When they were finally completed, I sighed a big sigh of relief and sewed on the buttons. I was not 100% happy with them, but 80% was going to have to do for this first attempt. I’ll do them again on another project and look for perfection. When that was done, it was time to place the four pockets.

Some patterns suggest that you do this before the buttons are in place. I figured that if I did it that way I would run the risk of the pockets looking too crowded with the buttons. This way I could actually see the finished product.

IMG_1359

So, I pinned them in place then hand-sewed them to the jacket using double-stranded silk thread for a bit of stability. The final step, of course, is the hem-line chain, a feature of Chanel’s jackets.

Originally inserted as a practical way of weighing down the jacket edges, the chain is now really more of a style statement. However, in the case of this jacket, the extra weight will be welcome. I sew the chain on using short lengths of doubled silk tread with one stitch in each link. These stitches, when done properly, are hidden under the link. I use short lengths in case the chain ever comes loose (which it has done in one of my previous jackets). The short lengths mean that it will only come away for a short distance to be fixed.

The chain is completed, so that can only mean one thing: I finally have a jacket!


Posted in Couture Sewing, Little Black (French) Jacket

Sleeves for my Little French Jacket (#3)

What would a jacket be without sleeves? Well, a vest, I suppose. But the truth is that a sleeve is not a sleeve is not a sleeve. In fact, when I look at this season’s runway collections (and everything in ready-to wear from the most expensive to the cheapest fast fashion) it seems that it truly is the season of the sleeves.

The fashion writers are calling them “statement sleeves.”

There would be this monstrosity from Gucci…

gucci fall 2017


Or this equally hideous one from D & G…

d and g fall 2017


Or this from Prada (as my husband would say, before WTF?, there is WHY?)…

prada fall 2017

But even more ubiquitous than all of the rest are various iterations of bell-shaped sleeves…

statement sleeves

I don’t love big sleeves, although an understated bell sleeve would be my style. So I’m not very adventurous…but I’m true to my style and really, doesn’t a sleeve have to have some practicality? Wouldn’t it be nice to wear sleeves that won’t drag in your pasta sauce, get caught in the escalator, elevator door, car door, subway car door, snag on someone’s enormous backpack, strangle you in a revolving door? Or is it just me? Anyway, this does bring me to the topic of beautiful, well-fitted jacket sleeves à la Chanel style.

When I made my first Little French Jacket I did a bit of research on what Chanel was really going for when she designed the three-piece sleeves in her original jackets. Apart from the fact that the three-piece sleeve fits better than the two-piece, which fits better than the one-piece sleeve, there was a bit more to it. For Chanel, the sleeve design began with the armhole. In these jackets, they were meant to have higher armholes than other jackets so that you could raise your arms without the jacket pulling up very much. If you think about it, that’s not a bad idea. Anyway, before we go there, I have to do one more thing with the lining of the jacket body: the lining has to be basted to the armholes so that when I set in the sleeves, I can then finish the armhole seam in the lining by hand. Now, on to the actual sleeves.

In the past I’ve wimped out and made only a two-piece sleeve, which does have its charms and offers considerably more opportunities for a good fit than a one-piece sleeve. This jacket, however, has a three-piece sleeve with a vent that will be trimmed and have two buttons with matching buttonholes. These sleeves are lined in exactly the same way as the body of the jacket: the silk charmeuse is machine-quilted to the fabric and the finishing is all done by hand. Only the actual setting in of the sleeve itself is done by hand: the lining is hand-stitched at the armscye.

The pattern’s designer (Claire Schaeffer – Vogue 8804) wants me to trim the sleeves before I quilt the lining on. However, my trim has to be sandwiched between the lining and the fabric. That means that I’m hand-stitching the trim to the underside of the fabric before I finish the lining edges around the vent opening. In fact, before I do any finishing.

trimming the sleeve vent

Setting in sleeves is a wonderful challenge in my view. So many people who sew seem to complain about this, but with practice, it gets easier. With this kind of wool tweed boucle, once you have two or three lines of machine gathering stitches in the head, the shape can be eased in with both the stitches and a lot of steam over the tailor’s ham. Claire Shaeffer also suggests that if you’re not going to set the sleeves in immediately after shaping, you should stuff them so that they keep their shape. Seems like a good idea to me, but I plan to shape them one at a time and set them in.

setting in the sleeve
Hand-basting the sleeves before final setting. 

Ever since I was in junior high school and set in my very first sleeve, I have always basted in the sleeves. If I don’t I have hordes of pins that continually stick into me. So I’m hand-basting as always with my Japanese cotton basting thread. Once I have it the way I want it, it’s time to sew it in. but this time around there is also going to be one more step.

These jackets are meant to be a bit slouchy, but only a bit. I guess you’d say they are meant to be soft. This means that generally there are no shoulder pads or other such underpinnings. However, my recent research suggests that a sleeve-head “cigarette” is often inserted. I’ve seen such a thing that looks a bit like a rolled cigarette, but more often than not when searching for a “sleeve-head cigarette” you’ll find it’s more like flat tape. I decide to make my own by measuring from notch to notch on each sleeve and cutting a 1 ½ inch wide strip of quilting that I used when I customized my dress form (Gloria junior). I then attached it by hand to each of the sleeve heads before drawing the lining up to the sleeve head, turning it, pinning it, hand-basting it then finishing the had-insertion. I use doubled silk thread for this since there is relatively more strain on armholes than there will be on the rest of the lining edges.

sleeve head cigarette

As for the results with the sleeve-head “cigarette,” well they are spectacular!

one sleeve with head one without
You can clearly see the difference between the right shoulder with its cigarette already in place, and the left shoulder before I put it in. 

My jacket is taking shape! I’ll be doing the fun part of finishing with buttons choices and those four lovely pockets, but that will have to wait. My husband and I are celebrating our 30th wedding anniversary on Tuesday and are off to South America for a vacation to celebrate. See you in November!


Posted in Couture Sewing, Little Black (French) Jacket, Style

LBJ*: The Finishing Details on my Homage to Chanel Style!


[*Little Black Jacket sometimes referred to as the LFJ or Little French Jacket]

A couple of days ago I ventured down to the fashion district here in Toronto to my favourite fabric store to peruse their bouclé and silk stock – because I’m finished! My Little French Jacket, that is. When I started this process back in March, I vowed that I’d take my time and get it right. I would not rush: I would get the fit right; I would take the time to do tests of all machine and hand techniques involved; and that I would make friends with my seam ripper. Well, I have done that, and the jacket is comfortable (oh so comfortable), fits well, and I think it adds a certains je ne sais quoi to my wardrobe. But it doesn’t quite pay complete homage to Chanel’s original LBJ style, and the story of why this is the case is related to the final part of the journey that I have yet to tell you about: it’s all about the trim.

No one seems to have written anything much about Chanel’s design considerations when she decided on how to trim her original 1954 tweed jackets, but we do know that they (almost) always have had trim.

Often the trim contrasts with the fabric, but these days the House of Chanel’s jackets more often seem to have trim that blends into the fabric. Whichever way you look at a Chanel jacket, it usually has trim around the neckline, down the front, across the pockets and on the sleeves. But that’s not all.

Chanel always said that the inside of a garment ought to be as beautiful as the outside, so she used exquisite silks to line them, and these little jackets were adorned with flat-link chains along the hemline. Originally, these chains played a practical role in ensuring that the jacket hung well even when the wearer raised her hands. You have to admit, though, they make a wonderful style statement even if you’re the only one who knows it’s there. Then, just imagine throwing the jacket over your chair back when dining out. Ah, the chain is now a part of your jewellery! So, in creating an homage to Chanel’s jacket, it’s important to consider the final trimming.

So, I begin to trim the jacket. I have purchased two types of gimp braid: one is a folded gimp, the other a more traditional flat gimp. Strictly speaking about definitions, gimp is made from twisted silk, worsted, or cotton and has a cord or wire running through it. Traditionally, gimp has been used in upholstery work and in making hand-wrought buttonholes. Gimp is then braided to produce the various types we see today and that the young woman in the fabric store who sold mine to me said they call it “Chanel braid.” The truth is that many (if not most) authentic Chanel jackets are trimmed with anything but gimp, although it does give that Chanelesque look especially when layered over other materials such as self-fringe or grosgrain ribbon. Anyway, my plan was to layer flat gimp braid over the folded gimp braid that would fold over all the edges. Well…

That idea didn’t work out very well. In my last post about the pockets, this is when I began to see a problem. First, I delayed the pocket finishing so that I could contemplate the trim a bit more. So glad I did! If I had put the layers of braid on the pockets (notwithstanding the significant bulk problem I would have had), I would likely have had to remove the pockets simply because of how they looked.

First, I hand-stitch the braid to the neck and front edges – it has to be hand-stitched first on the outside, then on the inside. It takes days. Then I pin the flat braid on top and begin hand-stitchng. I get all the way across the front and notice that it is distorting the line of the hem. Although I like the look of the layered braid, I cannot have a distroted hem. So, I finally un-pick the hand-stitching on the top braid and decide that the trim is finished.


In the meantime, I’ve been toyng with the braid which I had fully planned to put on the sleeve hems and on the pockets à la Chanel, but the look is too heavy. The pattern in the bouclé is such that it has heavy black patches and any more black just looks overdone.

So, the outside trim is well and truly finished. Now it’s on to the chain.

I had originally purchased a very lightweight gold-coloured chain. When I researched Chanel chains, though, I discovered that her jackets use various chain weights depending on the weightiness of the fabric, and that sometimes the chains are not even gold-coloured. Jackets that are trimmed with silver-toned buttons, for example, will have silver-toned chains. Huh.

The light-weight chain looks peculiar on this fabric, so I find a heavier one and bingo! I have the right chain. Then, ensurng that the chain remains flat, I start securing it invisibly with a double-strand of black, silk thread to the hem just below the lining – it fits neatly between the lining and the turn-up of the hem as it turns out. I start about 2 cm in from the jacket front and continue all the way across, pinning only a few links ahead to maintain the flat edge. I also do the stitiching in fairly short sections – this ensures that the thread does not knot and should a bit of the chan ever come undone, I’ll only have to re-stitch a small section. It’s time-consuming, but worth it. I then ask my husband to join me with his pliers to remove the link when I’ve come to the end. I choose not to measure and cut before I begin to avoid the dreaded possibility of cutting it too short!

The final stitch is in and god love my husband, he pours me a gin-and-tonic!

I try the jacket on and discover it’s the most comfortable jacket I’ve ever worn – and I love it! I’m dying to wear it, but it’s the height of summer in this part of the world, so I’ll have to put it away until October. I just might be able to wear it when we travel to Nova Scotia in September, though. They have cool evenings.

I’m taking only a brief break from jacket sewing to make a linen dress, but I’ll be back at the jackets as soon as the fall bouclé shipments are in! À bientôt!

Posted in Couture Sewing, Little Black (French) Jacket

LBJ*: Chanel-Style Pockets

[*Little Black Jacket sometimes referred to as the LFJ or Little French Jacket]

It’s a bit like giving birth – without all the pain and messiness – when at last I can put what resembles an almost-finished jacket on my mannequin (Gloria Junior as you’ll recall). And there it is, looking for all the world like a real jacket, yet still missing something. Next on the agenda, then, is to consider the pockets, because any jacket that is an homage to Chanel and her style needs pockets.

IMG_1086
It’s beginning to look like a jacket – but Chanel would not be pleased: no pockets or trim!


Before Coco Chanel, visible pockets were the exclusive domain of men’s clothing. Long before she designed the first “Little French Jacket” for her 1954 collection, she had already ventured into the external, highly visible pocket game. In the 1930’s she had designed the new sportswear sweaters with these external pockets.

many pockets
Well, there are pockets, then there are too many pockets!


According to most sources, Chanel herself was a little obsessed with pockets. She used them incessantly for lipstick, coins, cigarettes of course etc. and wanted them on her own clothing. Naturally, she thought others would want them as well. Many (if not most) original Chanel jackets from mid-twentieth century actually had four, not just two, pockets. These days even in collections from the House of Chanel itself, some jackets have two, some four, and not all are traditional patch pockets. However, in payng tribute to Chanel’s original jacket, they should be patch pockets – never just flaps! And since that’s what the pattern I’m using has, that is what will adorn the front of my jacket. On the other hand, I will put only two pockets on. I think four might be a bit much for this fabric (and you’ll see how right I really am!).chanel and her jacket

I didn’t cut out the pockets when I cut out the rest of the jacket so that I could be assured of a really flawless matching of the pattern. First I make a new pattern piece from the tissue paper one in the pattern envelope so that I can use it again. There’s really no need for full 1-inch seam allowances since I won’t be manipulating the fabric very much, so I stick with the usual 5/8-inch one. Then I make another pattern piece that is the size of the pocket only to the fold line. I’ll use this for the silk lining.

I then take my pocket pattern piece to the jacket front and place the fold line at the tailor tacks that are mercifully still there in the jacket front so that I can place it in the exact location where I will sew it on. Then with the pattern piece folded back, I mark the pattern where I’ll match it on the top and the sides. When I have that ready, I pin and cut the fabric pieces. Do they match? Well, if they don’t I do have extra fabric. But they do! A relief.

IMG_1089
My red pen marks align with the main lines in the fabric pattern.


IMG_1093
The pockets are there. Can you see them? If not, they match!


The first thing I have to do with the pockets is to stabilize the top edge. I don’t want the fabric stretching out of shape when I slide a hand into the pocket! So, using the same process I used when stabilizing the front, neck and sleeve edges, I proceed to prepare them for the next step.

IMG_1094
Stabilizing along the fold line.


I then cut out the silk lining then machine-stitch it right sides together to the top of the pocket. When I then fold the fabric down on the fold line, the fabric comes down about an inch inside the pocket and the lining covers the rest. Again with right sides together and folded back on the fabric fold line, I machine-sew the sides part way down, trim lightly, then turn right side out. I have to tuck under the rest of the seam allowance in on both the fabric and the lining so that I can finiish it with a hand catch-stitch.

The instructor in the Craftsy course suggests a neat way to ensure that both pockets – which have curved bottoms – are exactly the same. I follow her instructions taking a piece of light-weight coardboard to make a template from the bottom of the pocket pattern. Then I sew a single line of 5 mm ease stiting around the bottom and up the side about an inch. I put the cardboard template inside the bottom of the pocket then draw up the stitches to form the perfect rounded curves. I carefully slide out the cardboard and voila! I have a pocket ready to be trimmed, pressed and have the rest of the lining hand-sewn to it.

The pockets are finished – but not quite. They have to be trimmed before they are hand-stitched to the front of the jacket. So, I get out the first layer of gimp that I plan to use to trim the jacket à la Chanel. But it’s too much, I think. But I’m not sure. So I go off script for a bit and decide that I’m not going to put the pockets on at all until I actually finish the trim on the rest of the jacket. Then I’ll decide about whether I’ll use two layers of trim as I’ve planned, one layer or none. It’s a bit of a design process.

So, my jacket isn’t actually any futher ahead than it was at the beginnning of the pocket process. But the pockets will be ready when I am!

Posted in Couture Sewing, Little Black (French) Jacket

LBJ*: My Jacket Now has Sleeves

[*Little Black Jacket sometimes referred to as the LFJ or Little French Jacket]

sleeve pattern
A vintage pattern for nothing but sleeves!

There is nothing quite like setting in the sleeves to make a jacket look like – well, a jacket! Sleeves are interesting, aren’t they? I was browsing some vintage patterns online the other day (like you do), and stumbled upon a pattern from the 1930’s that was nothing but sleeves. I thought, what a great idea! Well, it’s part of a great idea. You have to have a garment body that suits them!There is little doubt that the same body with different sleeves can look vastly different. Even the pattern I’m using for my homage to Chanel’s Little Black (French) Jacket has two sleeve variations.


I’ve chosen to make it with the two-piece, bracelet-length sleeves for this time around (I’m already considering the next one!).

Even Chanel herself gave a lot of thought to her sleeves. In the past when I’ve put sleeves in jacket-like garments, they have always tended to be a single pattern piece. If you think about it, this kind of construction doesn’t give much leeway for what our arms are really like – that is, they bend. A real Chanel jacket always has at least a two-piece sleeve and usually a three- piece one which allows for having some ease in one of the seams at the precise place where our elbows bend. In addition, the multi-piece sleeve permits the sleeve to be narrower which gives it a more polished, well-fitting, custom look.

Another of Chanel’s concerns about sleeves was that they have a relatively high armhole. This vintage photo of Chanel herself shows her holding up her arm to demonstrate that a higher armhole allows the jacket to remain in place when the wearer raises her arms. What a great idea.

coco-chanel_sleeve
Coco Chanel demonstrating the advantages of the high armhole (Smithsonian)


Anyway, all of this research leads me back to the challenge of the day: preparing and setting in the sleeves on my own jacket.

I have already joined each sleeve’s two pieces ensuring that the requisite ease has been included. I have also machine-quilted the lining to each of the pieces. Now I am ready to construct them.

I pin back the lining along the seam just as I did when constructing the jacket body so that it doesn’t get caught up. Then, using a 3.0 mm stitch length and my trusty walking foot (could not live without it) as always with this bouclé, and remembering that I’m using a 1-inch seam allowance, I sew the seam. Then I add the two rows of ease stitching (5.0 mm stitches) over the top of the sleeve head.

IMG_1078
Seams are now sewn and the lining needs to be finished.


I begin pressing the seam by pressing it flat first, then using a seam roll (or in my case a rolled up towel since I’ve been too cheap to buy an actual seam roll), I steam the seam allowances open with the tip of my iron. Then I steam it lightly from the right side to finish the pressing. I trim the seam allowances then it’s time to deal with the lining.

Using the same technique I used with the body of the jacket, I first secure the one-and-a-half-inch hem with a catch stitch, then use a lapped seam for the lining along the seam and fold under a half-inch above the hem. Then I use that ladder stitch to hand sew the lining in place. Now I’m ready to shape the shoulder.

IMG_1083
Using my tailor’s ham

I use my tailor’s ham (fortunately I wasn’t too cheap to buy a real tailor’s ham which in my opinion is an essential sewing item) as a stand-in for a shoulder, I ease in the shoulder shape. It’s now ready to be set in. I am sewing the fabric (without the lining) of the sleeves to the fabric AND the lining of the body (I basted the lining to the jacket body fabric at the armholes ages ago in the process). Many people simply pin-baste the sleeves. I am going to do what I always do with set-in sleeves – I thread baste it in. This is a challenging situation since there is so much fraying fabric and open lining pieces that will eventually have to be hand-stitched into place, not to mention a plaid that has to be matched that I do not want to take a chance on losing pins or having the sleeve shift while I’m sewing. So, working inside what is akin to a paper bag, I slowly sew the armhole seam. When I finish, I hold my breath for a moment as I turn it right-side out. The sleeve is beautiful without a pucker in sight and even more fantastic is that the plaid is perfectly matched. The I have to do it all again on the other side!


Finally, they are in and my jacket looks like it is a real jacket. I just have to trim the seams and then hand sew the sleeve lining to the body lining. They are finished and I am delighted.

I try it on with a bit of trepidation. I altered the shoulder length a bit at the muslin stage and now this is the moment of truth as regards the shoulder fit. There is nothing worse than a jacket that droops over the shoulders when it is designed to be perfectly set at the shoulder line. I adjust things and look in the mirror. Perfect. Well, perfect enough.

I’m getting close to the end of the project although there are still many hours of hand sewing ahead. I first have to consider pockets and trim, but that’s the next step.

Posted in Couture Sewing, Little Black (French) Jacket

LBJ*: Constructing the Jacket Body

IMG_1040
It is high time that this pile of lined fabric pieces began to resemble a jacket!

It’s been quite a process, this project of paying homage to a Chanel icon by constructing a *Little Black (French) Jacket for myself. Many have gone before me – I was happy to use their experience as guidance when I was seeking my mentors to help along the way. Sometimes when I’m sitting at my counter sewing hundreds of tiny little stitches to connect pieces of the silk charmeuse lining together inside my jacket I consider what it must have been like for the seamstresses in the Chanel atelier in 1954 when they were working on the original jackets. Indeed, I wonder what it must be like today for seamstresses in the fashion houses who work on the haute couture garments – there is still a lot of hand sewing. But I’m getting ahead of myself. I need to tell you about what I’m doing.

Now that I have all my pieces quilted by machine, it’s time to construct the body of the jacket. My first task is to sew together the shoulder seams (remembering that I’m using a 3.0 mm stitch and a walking foot for all of these seams in the body), carefully matching the seam lines of the princess seams AND the pattern. It’s a bit fraught, but I do it and it’s perfect! Then it’s on to the side seams.

Since I’m feeling a bit nervous about making sure this is perfect, I decide to baste the seam line first. I do this only on one side only to find that it makes no difference: my pin-basted side works just a well. Years ago, I was taught to pin baste perpendicular to the seam so that the sewing machine could saunter over the pins. These days, everyone says do not ever sew over pins – take them out as you go along. In fact, the Craftsy instructor whose course I’m following, puts her pins in along the seam line which make a lot of sense if you really want to look at the right side to see if everything is matched. Of course, she takes out each pin along the way before she gets to it while sewing. I am now doing the same thing. Those perpendicular pins that I sewed over did, indeed, from time to time, get caught directly under the needle causing the pin to bend, often the needle to break, and there is no telling what kind of cumulative damage that had been doing to my old sewing machine! I will never again sew over a pin!

IMG_1063
Carefully trimming the bulk from the seam allowances after pressing them open.


I finish sewing the side seams and the moment of truth is upon me. Are the patterns perfectly matched? Yes! What a relief. Now it’s time to press the seams open – together flat first, then open with the tip of the iron on the wrong side, finally a light press from the right side.

Then the hem has to be stitched so that it doesn’t fall in future. The instructor uses an invisible catch stitch: I choose a small herringbone stitch (which is often also called a catch-stitch) so that the fraying ends are more secure. Then the front and edges have to be pressed in using the edge of the stay tape as a guide. The neck is tricky since it has to be snipped in – the fraying of the fabric can be a bit troublesome!

The lining now has to be joined at the shoulders and side seams by laying the front pieces flat over each seam, trimming the excess lining, then laying the back pieces over, trimming then folding under, pinning along the way. The lining is placed so that there is a small line of the jacket fabric showing on the inside along the front and neck edges, and there is no chance of the lining peeking out to the outside. The hem is similar, but the hem is folded up so that a half an inch of the fabric is showing. Once all that pinning is done, I start sewing. And I sew a lot.

I use silk thread, a very short, fine needle and a slip stitch for the seams. I use a stitch that is new to me for the front, neck and hem edges. It’s a bit like a ladder that when pulled gently actually creates a completely invisible thread line inside the folds adhering the lining to the fabric. It’s beautiful.

So I finally turn the jacket body right side out and put it on Gloria Junior (that’s what I call my mannequin). She’s still armless, but I love her anyway! Sleeves are next up!


A helpful resource:

Here’s a great blog post I found on How to Do the Ladder Stitch: http://www.squishycutedesigns.com/ladder-stitch/

Posted in Little Black (French) Jacket, Style

LBJ*: Sewing Like a Chanel Seamstress**…Quilting the Jacket

[*Little Black Jacket sometimes referred to as the LFJ or Little French Jacket]

In 1954 Coco Chanel made a return to the Paris couturier scene after something of a hiatus during and immediately after the second World War. The House of Chanel had been closed for fifteen years, but now it was time to return. During her absence, Paris style had been dominated by the likes of Christian Dior whose “New Look” had created those hour-glass shapes that constricted women’s shapes nodding more to form than function – no one could truly be comfortable with a corset and bustier! Re-enter Chanel.

new_look_tailleur_bar_vzg_03
Dior’s “New Look” silhouette required lots of undergarments!


Before the war Chanel had already created the first sportswear that women would wear, constructed from knits & jersey’s that had never been used in women’s wear before. Her absence had seen a resurgence of constriction and she was determined to change that. So, that first season saw the birth of what we now know as the quintessential Chanel jacket.

luxury quote coco

What made it different was the construction: it was fashioned from soft bouclé fabrics and lined with silk charmeuse which is truly the most magnificent feeling against your skin. But more important than even the fabrics was the way she designed the construction. Rather than a jacket with interlining and details that made it crisp and stiff, she decided that the lining was to be quilted to the pieces of the jacket and the lining finished by hand. She was striving for luxurious comfort above all, and a jacket that was as beautiful on the inside as the outside. And the construction of the jacket to this day uses this technique. So, if one is going to pay homage to the Chanel jacket, one needs to employ her approach. Dear god…

IMG_1040
My little pile of pieces!

My last report found me finally at a point where the sewing machine would make and appearance. All of the fabric and lining is now cut, marked, the soft tapes to maintain a bit of definition at the front and hemlines has been hand-stitched in place. Now the jacket pieces need to be constructed.


I use a 3.0 mm stitch length as directed by the instructor I’m following and I’m using regular thread (I may regret this) and a walking foot. This is not to be attempted without a walking foot! There are really only a few seams that need to be completed prior to the next big (quilting) step. I am remembering that the seam allowances are a full one inch! Very important to the eventual fit.

I sew the princess seams in the front pieces and the back, and put together the sleeves along the seam, making sure to use ease stitches at the point where the elbow will be. I construct the lining pieces exactly the same way. One of the most important parts of this process, though, is the pressing.

I first press the seams flat, then press them open from the inside using only the point of the iron. Then I turn the piece over and gently press each seam from the outside. The seams took terrific. I don’t trim any seams yet, though. There will be a lot of fraying and I need the depth and stability during the rest of the construction. When I am finished this process I have the following pieces: two front pieces, one back piece and two sleeves – and the same in the lining. They are all in a nice, neat pile. At the end of that lesson the instructor says, “The next step is the quilting. That’s when the fun begins!” And she smiles. Oh. My. Actual. God. The QUILTING!

I cannot remember when I have been as frustrated in a project. The process is thus: With wrong sides together, each piece of lining is machine stitched to its matching jacket piece using a 3.0 mm stitch. Each stitch line is meant to travel down a line of the ‘print’ from about two inches from the top (so that the lining is loose and I will be able to get at the side and shoulder seams in due course. The lines of machine quilting (yes, Chanel jackets are generally machine-quilted) are to be one-and-a-half to two inches apart, all done in the same direction (from the top down) and ending two inches above the hem line. Sounds simple enough. Well…

I make my plan as directed so that I know which lines I’ll follow, pin the seam lines together and use lots of other pins so that the fabrics don’t slide out of place, then begin stitching using that 3.0 mm stitch and silk thread to match the main lines of the jacket pattern – in my case, black. From the right side as directed. Oh my god… the stitches are way more visible on the outside than I want them to be! What to do?

I start unpicking hoping like hell that the stitches don’t make holes in the silk charmeuse. They’re not too bad after I press them out. So I start again. I do another test piece using various threads and stitch lengths. I ask the instructor who agrees that the pattern on the fabric with its white lines crossing black will make it very difficult for this to sink in invisibly. I note that other students are posting with their own similar concerns. No one has a real solution.

IMG_0984
My fabric


lornas fabric
My instructor’s fabric – she has definite black lines to follow!


So, I do it again, using a 4.0 mm stitch and this seems to work better. I only catch the lining up in the stitching twice resulting in having to unpick twice for that reason. I only have one line that seems to have caused a bubble between it and the adjacent one, so only have to unpick for that reason once. I have to do this in several sessions so as not to either tear my hair out or rush through and make a mess.

Finally, it’s done. And it doesn’t look too bad in the end. I have all of the pieces quilted and the next step will be to stitch up the side and shoulder seams and then focus on the lining. That’s for next week! I need a martini now…


[**Please don’t take me to task for using the word ‘seamstress.’ I realize that in some people’s worlds this is a sexist term, but I think someone who sews can call herself (or himself) anything she or he wants: seamstress, sewer, sewist, tailor – you pick one, I’ll pick one today and perhaps another tomorrow. Actually at Chanel they are called ‘mains’ which of course is French for ‘hands’]

Posted in Little Black (French) Jacket

LBJ*: It’s What’s Underneath that Counts (Marking & Stabilizing)

[*Little Black Jacket sometimes referred to as the LFJ or Little French Jacket]

I cannot wait to begin actually constructing my Little Black (French) Jacket that is an homage to Coco herself. But, in spite of all that I’ve accomplished already, and all the time I’ve spent to date, I’m still not there yet. Before I can take the fabric to the machine, I have to prepare it further by marking everything imaginable and stabilizing the edges.

Anyone who teaches sewing online or in the classroom it seems will tell you that one of the keys to a garment that fits and looks professional is ensuring that all relevant pattern markings are transferred somehow to the fashion fabric. In the case of the bouclé and silk charmeuse I’m using for this project I can only use silk thread – both tracing and tailor’s tacks.

I learned to make tailor’s tacks in home economics sewing classes when I was twelve years old. You run a double thread through the pattern and two layers of fabric leaving a tail and a loop. You then cut the loop and carefully peel apart the layers. Then you cut the thread between the layers leaving markings on both layers in exactly the same place.


Unfortunately, with the bouclé, these loops continually slide out leaving me with no markings. So, I’m going to have to use my Craftsy instructor’s technique which involves a single thread through a single layer stabilized with a tiny, tight stitch.

In addition to all these tailor’s tacks which have to mark both the fabric and the silk charmeuse (from which all of the threads continually slide – I’m going to have to refer to the pattern as I sew, I think), I decide to thread trace most of the seam lines. Although this particular instructor doesn’t’ suggest this, others who teach this French jacket technique do, and it will ensure that I don’t lose my sewing line as the bouclé inevitably frays – which it does. I’m trying to handle it as little as possible to reduce this, but it goes along with this type of fabric.

IMG_1024
Thread tracing & tailor’s tacks on the boucle.


Now it is time to stabilize. Most instructions for this type of jacket suggest using the selvage edges from silk organza. I had some difficulty finding some, and you need a whole lot to be able to cut enough selvage to run around the entire edge of the jacket – including the hem. So, I decide to use soft twill tape – not quite ‘kosher’ it seems, but I think it has a good feel. The stability at the edges shouldn’t be thick or hard, just enough to ensure that the trim has a foundation and the hem stays straight. So I begin.

IMG_1026
Pinning the tape to the centre front edges


I start with the centre front pieces, placing the twill on the jacket side of the seam allowance and pin-basting it in place, ensuring that the snips I make to fit it around the neck don’t go in too far, and that the corners are neatly and securely pinned.

IMG_1030

Then, using tiny stitches with silk thread I sew the seam-line edge of the tape to the fabric. Then I use a herringbone stitch along the inner edge so that the tape will stay flat. I also decide to interface behind where the pocket will be attached. I cut some soft, fusible interfacing (not authentic since most couture garments do not have any ‘fusibles’ in them) to go just beyond where the pocket will be, cut it in two so that the piece on the centre front and the side front go on separately, then fuse it to the pieces. Voila!

I then repeat the process with the back neck line, the hems of all the pieces and the hems of the arm pieces. It takes me quite a while, but when I’m finished, I love the thought that the under-pinnings of the jacket are so well thought out and put together. This is the work that is needed before I can begin putting the body pieces together and quilting that silk lining to the inside of the jacket à la Chanel! Lots of fun ahead!


Resources:

Here is a link to a terrific Craftsy tutorial on making tailor’s tacks (they seem to use my own personal method!): http://www.craftsy.com/blog/2015/01/tailors-tacks-for-pattern-marking/

And another one that also uses the same method!: http://coatsandclarksewingsecrets.com/blogcategory/sewing/tailor-tack-tutorial-by-gertie-2

Posted in Couture Sewing, Little Black (French) Jacket, Style

LBJ*: Finally Cutting the Fabric & Lining

 [*Little Black Jacket sometimes referred to as the LFJ or Little French Jacket]

FullSizeRenderWhenever I’ve thought about sewing projects in my past, I’ve always considered cutting out the fabric to be the first job in the process. This project is so different.

I’ve already researched, found mentors and teachers, measured, cut and sewed a toile, made a personalized pattern and found fabric and lining perfect for the project. Now it’s really time to cut. And I have to say I’m just a bit nervous to put my shears to this boucle and silk charmeuse. But I must be brave and cut!

One more thing to do before I lay out the fabric: I have to steam the fabric so that it sort of shrinks now and not after I’ve already cut it out. As I do so, I need to be sure that I don’t let the fabric hang over the side of the counter because it will surely stretch, and after all the time I spent preparing the pattern to actually fit, that would be a big problem.

So now I can lay it out, and as my online instructor says, it is laid out in a manner that no one really wants to hear: in a single layer. This means that after each piece is cut out, a mirror image has to be cut out. It is a time-consuming process, but I do feel that this is the only real way to ensure that the pattern matches.

IMG_0607

So first I lay out the back piece and then the side back right beside it, checking that the seam line (not the sewing line) matches up at important places: corners, notches, hem line. I also loosely lay out the rest of the pieces along the single layer of fabric since I don’t want to find out that I’m short fabric. Lining them up this way also ensure that they are all laid out in the same direction. Although the boucle doesn’t have nap as such, it needs to be treated as if it does – hence the need for extra fabric. I bought extra fabric, and I’m going to need it.

IMG_0608
You can hardly see where on piece ends and the other begins. I think I’m on my way to pattern matching!


I will also need to line up the pattern at the shoulder seams as I move the pieces across the fabric. Now I’m finally ready to cut. I take a deep breath and start. Once the fabric is actually cut, I know I’m past the point of no return. I carefully cut each piece out matching as I go. I’m especially concerned that the front pieces match across the opening. Nothing says “amateur” more than mismatched patterns in a sewing project of this nature.

I then have to take each piece and lay it on the fabric to cut its mirror image. It has to be laid out so that you can’t really see each piece like this:

IMG_0612
Can you see the edges where I’ve laid one cut piece onto the single layer of fabric to cut its mirror? Look hard – the edges are there! But I think it’s going to be a good match if all continues to go well.


Then it’s time to lay out and cut the silk lining. That’s tricky since the charmeuse is so thin and slippery. Applying the lining in this jacket project is one of the features that makes it different than other jacket construction approaches, and it’s what sets a real Chanel jacket apart from the competition. The lining will be machine quilted to the jacket body and sleeves. This means that the lining needs to be slightly larger than the shell to allow for ‘shrinking’ down of the fabric with the quilting. This means that I have to add about 1/8 to ¼ inch to the pattern pieces everywhere except the hem. It’s not as precise as I would like.

I follow the instructor’s directions to simply lay each fabric piece as cut on the lining (doubled which is contrary to what I know about working with silk), add a few pins and cut larger. This is treacherous since the silk charmeuse moves around. I become frustrated that I might be cutting off the grain, but persist until I am finished. The next time I do this I’m going to cut out the lining single-layer with the pattern piece on top and a piece of pattern paper underneath. I will then cut through all three layers to keep the silk from slipping. My only salvation here with the cutting lines so imprecise is that the lining will be quilted to the well-cut fabric and I can deal with the seam allowances with accuracy after the jacket body is put together.

Two pieces I don’t cut out yet are the pockets since I’ll have to match the pattern after the front pieces are assembled.

So now that I have the fabric and lining cut out, I’m reminding myself of the long process ahead by watching the video from the Chanel atelier. And I’m thinking about all the marking I have ahead of me before I can get at the sewing machine.


Secrets of the Little Black Jacket (At the Chanel atelier)

Posted in Couture Sewing, Little Black (French) Jacket, Style

LBJ*: Choosing my Jacket Fabric & Lining

[*Little Black Jacket sometimes referred to as the LFJ or Little French Jacket]


bolts of fabricAnd so the real fun begins. Here’s where I get to play fashion designer. I remember years ago when I used to make most of my own clothes, I never began a project without having first chosen the fabric for it. I found a pattern in a big pattern book at a fabric store, then went immediately to the bolts of fabric to find and buy my fabric. Nowadays, I actually buy all my patterns online, and use online and in-store sources for fabrics. In fact, in the case of this – my little black (French) jacket project – I put off the fun of finding the right fabric until I had gotten to the point of actually being ready to cut it out. I am now ready, so I need fabric.

I am lucky to live in a city where the fashion design industry is vibrant. Toronto might not be Paris or Milan, but it is the epitome of internationally-recognized Canadian design, and we have a ton of great designers, many of whom now live and work abroad as it turns out. But they started here. It also means that there are fashion design programs of study and putting these two things together means that we have an actual fashion design district where the fabric stores line the street – Queen Street West to be specific.

After my previous experiences with those large, light-filled, airy fabric-store chains, the real fashion fabric stores came as a bit of a surprise – and a surprise that I am loving. Each of them is jam-packed from floor to ceiling with bolt after bolt of fabrics, not all of whose provenance or fiber content are immediately evident. However, these stores are staffed by exceedingly knowledgeable staff members who will be able to answer any of my questions and they do.

I amble along Queen Street browsing several stores. Because of my research about the Chanel jacket, I’m looking for a specific type of fabric – a bouclé – because many if not most of the real Chanel jackets are constructed of bouclé. So, what exactly is it I’m looking for?

First, it’s important to realize that the word bouclé is the French word for “curl.” So, the word bouclé refers to both a kind of fabric and a kind of yarn, both of which are characterized by loops. Bouclé fabric has a kind of loopy appearance if you look at it closely. It is also fairly loosely woven – which was the reason that I used one-inch seam allowances when I created the patter as you might recall. This loose weave means that it frays. But what about fiber content?

Bouclé can be made from a variety of fiber types – wool, cotton, silk – and these natural fibers are often combined with one another and even with synthetics to achieve various properties. Since they were introduced in 1954, the jackets produced by The House of Chanel have been created in a variety of fibers and, as I mentioned in my initial research post, Coco herself found her original fabric at Linton Tweeds in northern England.

I did browse through their site when I first began to search for my fabric and I found wonderful bouclé’s and tweeds. However, none of them really were exactly what I am looking for. I am looking for something that is in the black, white and/or grey family. I think that a neutral jacket will suit my lifestyle better than any other colour. But what I did learn from their site is a lot about the fiber content of their fabrics.

I found this one that I liked, though. Notice that the fabric content is 65% viscose and 35% cotton (I also noticed the price which was £34.00 which is about $70.00 CDN a yard – not going to happen the first time I make this jacket! But isn’t the fabric beautiful?

linton 1

linton 2
If you look closely, you can see the loops on the surface.

I also liked this one, and I think you can actually see the loops that I’m talking about. Beautiful. Same fabric content. I also found others with various combinations of polyester, viscose, wool, nylon, cotton and acrylic. So, I realized that I was really looking for a combination or fiber types and I was looking specifically for some kind of a wool blend when I perused the shops on Queen Street.


When I walked into “Affordable Fabrics” and found their large stash of bouclé bolts, I was fairly sure I’d found my fabric store. Sure enough, after taking down several bolts (with help from the young man working in the store that day), opening out the fabric and taking them to the window for better light, I found the one that I was looking for. Then all I needed was lining.

20120316-affordable-textiles-inc
The unimpressive exterior belies the wealth of fabrics inside!

The instructor on the Craftsy video course that I’m following is using silk dupioni which of course is a bit sturdier than some silks. My research told me that real Chanel jackets are generally lined with silk charmeuse. I first looked at their stash of silk dupioni and didn’t see a colour that I felt would do what I wanted for the design (there’s the fashion designer in me talking!). when I asked the young man about their silk charmeuse, he said, “I have just the thing for this fabric!”


He pulled out a bolt of fabulous printed black and white silk charmeuse and I fell in love. When I asked him the price, I was ready to cringe, but it wasn’t so bad. I now had the makings of a beautiful jacket. Of course I was going to have to learn to match a pattern, but that would come later. Oh, and I’ll need braid trim and a chain for the hem, but I think I’ll work with the fabric a bit before I decide on the finishing.

Next up: cutting it out! Yikes!

A great blog post on finding fabric on Queen Street in Toronto: http://www.loulou.to/streets-of-toronto/shopping-for-fabric-on-queen-street-west/