Posted in sewing, sewing patterns, Style, wardrobe planning

Cozying up to fall and winter: Sewing up comfort

If you live in the northern hemisphere, you’re looking straight down the barrel of autumn into winter. In my neck of the woods, though, that autumnal barrel feels curiously summer-like. The recent temperatures here in Toronto feel more like summer than fall, and even the leaves are slow to change this year. Don’t get me wrong. I’m not complaining. An early fall and winter mean a long winter, and no one wants that. Really. No one wants that. The point is that it makes designing and sewing a cozy winter wardrobe less appealing. *sigh* Yet it is time. So, cue the air conditioning and off I go.

When I first started thinking about this year’s wardrobe additions, I was drawn to that Scandinavian concept of hygge. The Visit Denmark website defines hygge this way:

…hygge means creating a warm atmosphere and enjoying the good things in life with good people. The warm glow of candlelight is hygge. Cozying up with a loved one for a movie – that’s hygge, too. And there’s nothing more hygge than sitting around with friends and family…[1]

So, I’m looking for cozy and comfortable. When I began to consider what inspired this in me, I remember seeing Audrey Hepburn’s après ski look in the movie Charade. It felt comfortable, cozy and oh-so-chic and sophisticated. That seems like the right combination of feeling to me!

Audrey in the movie Charade…in the Alps!

These days, several high-end brands evoke a similar kind of feeling. And when I spied this Totême sweater, I thought, that looks like the Vogue pattern I have in mind for this season.

Totême is a Swedish cult brand that offers timeless styling running fairly high-end. For example, this sweater is $952 CDN ($770 USD) today. Okay, it’s fabricated from a “yak and wool blend,” and I have no intention of yakking a wool blend for my own personal comfort, but I think we can get the feeling. Here’s what I made.

Vogue 1635 drew me in because of both the neckline and the zipper design detail. I knew I’d make it in some kind of a knit. Thus the clean finish―absolutely no visible stitching―was interesting. Most knit patterns have topstitching and machine-stitched hems, which is fine if that’s the look you want. I thought a clean finish might be nice for a change.

I ordered this “jogging fleece” (although it reads far more like medium weight French terry to me on arrival) online from Fabricville back in early September and put it away for this project. It’s 50% polyester / 50% cotton, so it isn’t quite the yak and wool thing, but it’s soft and comfortable, and I expect far less scratchy!

The design also requires a very long zipper―30 inches to be exact (although you can’t know the precise length until you have it measured to your own arm and shoulder length). It seems that 30-inch zippers in your specific colour requirement are hard to come by, so I ordered a duvet zipper. Problem solved. Well, almost solved. I’ll tell you about the zipper. Stay with me.

So I began to cut and sew. The pattern is provided entirely as single-sided pieces, so I cut it out in a single layer. Not a problem. The style is simple enough―anyone with any experience sewing with knits ought to be able to accomplish it with good results. I ran into my first snag when I began to work with the zipper. Now, this is a zipper that won’t actually ever be undone all the way down to the end of the sleeve. There is no need for it, and if you look at the photos of the finished product on the envelope, it’s clear that this is a design detail only. It might be nice to open it as far as the shoulder edge for ease of donning the piece. So, it should have been simple enough.

I began by ironing the stay tape to the edges of the split sleeve, then finished the edges. Then I attached the two sides (front and back) to the front and back of the bodice.

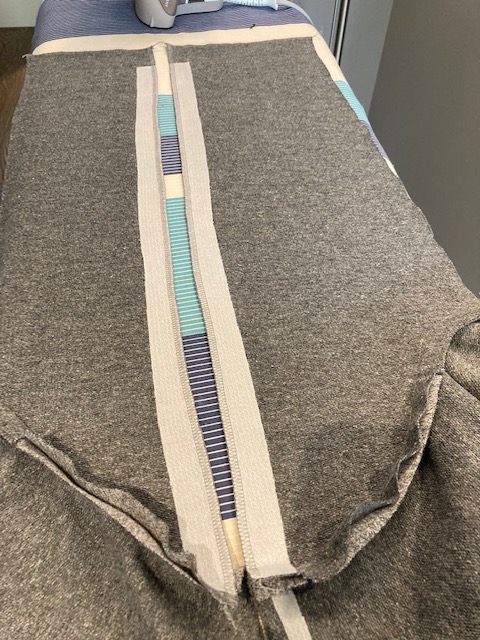
As I read the instructions for putting in this zipper so that the stitching is hidden while the zipper teeth remain exposed (that design detail), I was perplexed. If you look at the instructions, doesn’t it look to you like they expect this to be a separating zipper?

Well, there was nothing on the envelope to suggest this. Notions required: a 30-inch zipper accompanied by a photo of a non-separating zipper. *sigh* Anyway, that was only the first issue, but it was a fixable one.

The second boo-boo I made was not finishing the edges of the shoulder seam before attaching the sleeves. So, out came the seam ripper and a slight detour to the serger. The biggest zipper snafu was yet to come.

I pinned on the zipper to determine the length I needed, then cut it to length. Voila! Not so fast. I cut the closed zipper, which left the zipper pull at the top―attached to the part of the zipper I didn’t need. *slaps head*

I first tried to get the zipper pull to go on the top edge, which naturally didn’t work. My husband came to the rescue with needle-nosed pliers to hold the zipper edges while we did it the right way: putting the zipper pull on from the bottom. That worked. Lesson learned. Open the zipper to below where I want it to end before cutting it!

One of the things I did do right was to fit the sleeve length carefully before starting. I shortened them a half an inch at the tissue paper stage and then tried them on for length before inserting the zipper. Once that sucker is inserted, there’s no going back. The length has to be right.

Since this garment is designed to have a completely clean finish, the hems are hand-stitched. This seems like an oddity for a knit garment, but I fused the hems with hem tape them hand-finished them. I do love how it looks.

I do love the finished product, and with a bit of photo magic courtesy of my talented husband, I can imagine it on a ski slope (something we gave up years ago while standing on the top of Mont Ste. Anne in Quebec with the freezing wind whipping our faces, asking one another, “What the hell are we doing up here when we should be on a beach under a palm tree?”). I can also imagine it in a casual office environment. One piece of hygge-worthy winter clothing done. Now on to the next!


[1] What is hygge? https://www.visitdenmark.com/denmark/highlights/hygge/what-hygge

Posted in fabrics, sewing, sewing patterns, wardrobe planning

Choosing fabrics for a fall wardrobe (there may have been a trip to Montréal involved!)

Who among us hasn’t longed for a wee bit of a travel escape over the past eighteen months? Sure, staying close to home has afforded those of us who sew some extra time to escape into that happy place we call our sewing space, but if you love to travel, a little getaway sounds nice, n’est ce pas?

Montreal begins to look like autumn.

If you’ve been following my fashion, sewing and creativity journey for a while, you’ll know that my husband and I enjoy travel so much that we’ve been sharing our travels on our travel blog for years (www.thediscerningtravelers.com). Since we returned from our winter getaway in March 2020, that’s been on hold. But last week, ooh-la-la, we went to Montréal. Why Montréal, you may ask? Two reasons: it’s a reasonable distance for a three-night trip, and it has a fabric/garment district that I’d been longing to visit.

So, last week, we hopped on a ViaRail Canada train at Union Station in Downtown Toronto. Five hours later, we were in downtown Montréal checking into the Chateau Champlain Marriott Hotel. The fact that we could eat indoors (after showing our vaccine certificates, of course), have someone else pour our drinks and wander in Vieux Montreal (Old Montreal) was such a treat. Then we took an Uber to St. Hubert Street, and I was in heaven.

As you may recall, my fall wardrobe sewing/shopping plans include a blue-grey-black-red colour scheme, soft fabrics and lots of comfortable tops that I can wear with jeans, an approach to dressing that suits my current lifestyle―I walk 5-7 kms a day and sit in front of a computer writing books.

My F/W 2021-22 colour scheme

Another thing I’ve learned through this pandemic, though, is related to the quantity and quality of the clothes I wear.

For months last year, we were in lockdown, and I couldn’t shop for clothing. Yes, I know there is always online shopping (and I did a minimum amount of that), but I couldn’t feel the fabrics and try on the clothing without the hassle of having to send things back. So, I waited. And when I was finally able to shop again, I found myself wanting less but wanting better. This is now my overall approach. Just this past weekend, we took three large garbage bags stuffed full of clothing we rarely (if ever) wear any longer to our local donation bin. And it feels so good to have that space around us in our closets. I had this in mind when I opened the door at Tissus St. Hubert in Montreal and stepped into a world filled with high-quality Italian fabrics. I thought I’d died and gone to fabric heaven. (FYI, tissus means fabric in French.)

Unlike many downtown fabric stores, this one was well-organized, bright and airy―yet it was chock full of beautiful fabrics, primarily silks and wools. There wasn’t a synthetic to be seen!

When I walked in, I was immediately drawn to a piece of blue fabric that looked and felt like a wool jersey. But I moved on to the silks lest I miss anything. When I found a few pieces of silk that I thought looked interesting, the young man (obviously one of the proprietors) came to help.

I liked these beautiful silks, but they weren’t really what I was looking for.

He was only too happy to open each bolt that interested me so I could get the full effect. It’s really the only way to see what you’re buying. He was so helpful and even said that high-quality fabrics (with high-end prices) required high-quality service. I got that and more.

I considered several pieces of silk and settled on one that is reminiscent of animal print but in a more subtle way.

It feels magnificent, and I can’t wait to work with it. Note the colour fits into my current palette (although I may well make this blouse (Butterick 6765), view C with the short sleeves to take on our winter holiday (that’s winter clothing, isn’t it??).

I then circled back to the blue fabric that had caught my eye, and just like my husband always used to say about choosing Christmas trees: you always buy the first one you looked at (I did the same thing with my wedding gown! I’m reminded of this because our anniversary is next weekend!).

The young man told me that it was, in fact, a fine wool jersey. Since he had recently bought up the stock from another well-known Montreal fabric store whose proprietor was retiring, he did a burn test to assure us―and himself―that the fabric content was indeed correct. My husband was fascinated with this, and the young proprietor was very knowledgeable.

I found these terrific charts on Domestic Geek Girl[1] , and if you’re interested in more detail on how to check your own fabrics for content, the link at the bottom takes you to the excellent article on it.

Anyway, it was pure wool jersey, so I naturally bought what he had left on the bolt. (BTW, the price on the bold was $189.00 a metre!! He sold it to me for $60.00 a metre, which is more like it!). Then it was on to Goodman’s down the street to peruse the cheaper contributions.

Goodman’s was more like the crowded shops I frequent in Toronto.

I bought a lovely, soft synthetic (black, of course―the best colour for synthetics. I’ll use it to test out the pattern I plan to use for that blue wool jersey. I’m looking at the Jalie “Charlotte” cardigan. It seems appropriate since it’s named after my favourite heroine Charlotte “Charlie” Hudson! (From all three of my most recent books). This design will be a great layering piece.

I also did a bit of shopping at a small shop called Ultratext, which is packed to the brim with sewing notions. Then it was time to get back downtown for dinner.

While I was in Montréal, I also bought a few RTW pieces that I’ll need. This included a terrific pair of Frank Lyman black jeans with a bit of embellishment. I think my new tops will be perfect with these. (I also bought a St. James Breton shirt since they’re not so easy to find, and I’ve wanted one for a long time.)

This is the one I bought, although they didn’t have stock in, and I’m still waiting for it to arrive from Montréal. (Note the red heart-shaped patches on the sleeves that make it part of my colour scheme. Well…)

Back in Toronto, I found myself still needing a bit of red to add to the mix, so I went to Chu Shing Textiles―my current favourite shop―on Queen St. West and found the perfect, medium-weight bamboo jersey. It’s the perfect red for me and the ideal addition to my greys and blacks.

I haven’t completely worked out which fabrics I will make into which of the designs, but I’m getting there.


[1] https://domesticgeekgirl.com/uncategorized/fabric-burn-test-identify-fabric-pyro-way/