Posted in Couture Sewing, Little Black (French) Jacket, Style

Cutting out & marking my ‘Little French Jacket’ for a perfect fit

-Luxury must be comfortable, otherwise it is not luxury.-The more expensive the fabric, I buy, the more trepidation I feel just at that moment when, shears in hand, I hover above the swath of fabric on the table in front of me. I have already prepared the tweed bouclé by steaming it within an inch of its life, and I have carefully laid it out, in a single layer to ensure accuracy. I have carefully measured the grain lines and pinned them precisely where they are supposed to be. But this time around – on this third Little French Jacket – I’m using a slightly different approach to cutting. Rather than simply following a seam allowance, I’m just doing a rough cut. I’ll be marking seam lines and using those for a more accurate fit. And yet, here I sit, shears at the ready, taking a moment to pause and breathe before that first snip. Once that’s underway, I’m committed. Here I go.

This is actually fun, I think as I snip away ensuring a minimum of an inch (which I am eyeballing), all around the perimeter of the muslin pattern that I have already fitted and prepared. Once I have all of the pieces cut out, I am ready to thread trace all of the important markings.

sk-basting-thread-305x305
Japanese cotton basting thread – photo from SusanKhalje.com

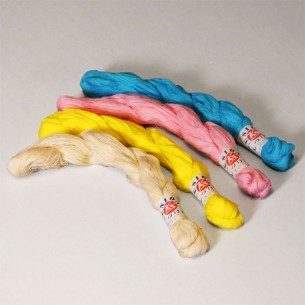
I’m using a product that is new to me. When I viewed Susan Khalje’s couture dress class (I am working on the dress too, but that’s a whole different story!), she introduced me to the concept of Japanese cotton basting thread. She sang its praises so much that I had to have it. I also had to have her large sheets of waxed tracing paper that I used to mark the muslin pieces, so I ordered them all together.


It’s interesting stuff. I have these skeins in four different pastel shades and have selected the pink for my thread tracing. The instructions are to tie a ligature around the skein and cut it in one place. Then I am to take individual threads that will evidently come straight out, not disturbing the remaining thread. And it will be in the perfect length for basting they say. Well, it actually works. So I begin.

First I trace all of the seam lines. At the corner of each intersecting line, I use Clair Schaeffer’s method for taking the corner, knowing that I’ll be able to snip those corner threads to remove them in due course. And I know that I have a precise corner point.

IMG_1226

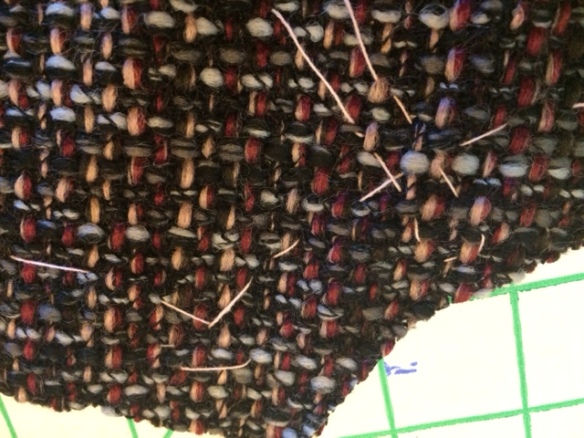
I also use thread markings for the notches, circles, quilting lines on the front (as I mentioned earlier when I examined the pattern, I’ll make up my own mind about where to put the back quilting lines when I get there).

I have cut this out in one layer, but since I made up only a one-sided muslin pattern (that may not have been the best idea I’ve ever had), I do my marking and thread tracing as I go. In other words, I cut out one centre front piece, mark it and then take the muslin pattern piece off and cut out another one and so on. I have been very carefully marking the wrong side of the fabric with a piece of patterned tape held securely with a safety pin. The fabric is essentially the same on both sides, but it would be awful to find I’ve prepared two right front sides rather than a front and a left because I mixed up the right and wrong sides!

fringe
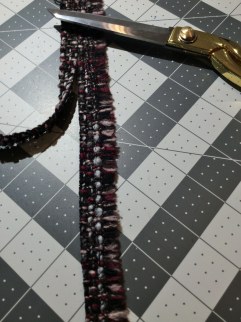
It’s important at this juncture to say that I am also being careful not to cut through any of the selvages. I am preserving them because they are fringed. I don’t know yet how I’ll trim this jacket — that’s a design decision for later. But I do know that I might want this fringe at a later date.

When all that marking is done, I move on to cutting out and marking the lining.

I love silk charmeuse against the body – but I’m not as big a fan of it on the cutting table. Usually, one would cut this in a single layer, but I am finding that using muslin as a pattern rather than any kind of paper pattern makes cutting this out double-layered so much easier. So that’s what I do. Again, I’m rough cutting because I’ll mark the stitching lines to use. I am using white waxed tracing paper and the same method I used with the muslin to mark the wrong side of the charmeuse.

I also need to cut out a piece of interfacing – it’s really underlining in my view, though, regardless of what it’s called on the pattern – for the front of the jacket to support the buttons and buttonholes. In my previous jackets, there was no such layer since they had open fronts.

I test a few fabrics and realize that the only option that will give me the look and feel I want is, indeed, the silk organza – only pure silk will do.

And so, now I’m ready to test stitches, cut out little pieces of iron-on interfacing to place behind the buttonholes, and start sewing. A jacket is on the horizon!

Posted in Couture Sewing, Little Black (French) Jacket, sewing

My Little French Jacket #3: Muslin-fitting challenges

home-ec-class
Ah…home ec classes!

When I learned to sew – way back in the ‘olden’ days – the notion of making a muslin/toile/test garment never occurred to any of us in the ‘home ec’ classes of the day. In fact, the idea of taking the time to make a garment that you would never even wear (don’t get me started on the notion of a ‘wearable muslin’ – a rant for another day) was so foreign as to be laughable. These days, however, for my money, making a quality garment of quality fabric without a fitting muslin would be fool-hardy. For me, getting that fit right before laying out and cutting my fabric is key to the success of the project and my feeling of accomplishment. So, in the case of my current project, when last we talked, I had whipped together the toile and was just about to put it on. Moment of truth…

Dear god…it’s hideous. Every single complaint anyone had about this pattern played out before my eyes in the mirror. Despite the fact that I had done a tissue fit, I had not, of course, fit the sleeves. How problematic could they be? As it turns out – very problematic. And although the thing now fits around me relatively well, the shape was clearly wrong.


Reviews I had read of Vogue 8804, Clair Shaeffer’s LFJ pattern suggested that it was boxy, despite the picture on the pattern envelope, so I had nipped it in a bit. Not nearly enough. For me, the upper chest area was also billowy, but with princess seams, that’s always an easy fix for me and becomes the difference between the fit of an off-the-rack jacket and a custom-made one. First adjustment taken care of.


The sleeves are another problem. Given that one of the hallmarks of a Chanel-inspired jacket is the slimness of the sleeves, I’m left wondering just who CS and Vogue thought had arms this large. However, since they are three-piece sleeves, there are several different points of reduction available to me including that seam that runs from the shoulder point to the cuff. I also add a dead dart at the under arm which helps. But the sleeve head also seems too bit for the armscye at the front — too much fullness that will have to come out. Also, they are an odd length for me. They are designed to be bracelet length, and I thought that I’d like that. Turns out that the proportion is just wrong on me—it might work for someone else, but not me. So I decide to remove the sleeves, re-cut them and see how the second pass goes.

sleeve fit problem

The bottom line at this point is that I need to do a second muslin.

I use the pieces of my first muslin with their extensive alterations as the pattern for muslin #2 and sew it up. When I look in the mirror, I see that it is better, but there are still some fit issues.

The sleeves now fit better and are a better length, but it’s still a bit boxy – the waist is too wide and needs to be nipped in at the front princess seams and a bit at the sides. There is also another issue.

When I first cut out the pattern, I did note that CS had used ease at the bust along with the princess seaming. The pattern directions then call for this to be converted to an underarm dart in the lining.

IMG_1167
On the first muslin, I had to take a dead dart from the side seam to the armsye on the front to get rid of some of the boxiness. 

I had thought this would be a good idea, but now it’s just puffy. Of course the muslin fabric does not have the characteristics of fluidity that will be part of working with the bouclé, but I’m wondering if removing the ease with a dead dart will improve the fit. And…it does!

Then there is the length issue. I ignored it at the first muslin fitting, but now it’s of concern. It’s either not short enough, or not long enough. After consideration, I opt for the shorter length, then see that there is too much flair at the hemline. I lengthen it again to the original pattern length, and the flare only gets worse. So it’s back to the drawing board for the hem.

IMG_1202
You can see the dead dart in the sleeve: I took it from the armhole to the centre seam. This did get rid of the excessive ease in the front of the sleeve but you can still see some of the puckering at the sleeve head. 

I take the hem down again, reduce the width of the side panels and shorten it again and it works. Now I need to evaluate the pocket placement.

This jacket has four pockets and when I examine their location on Chanel originals, I note that the placement varies a lot. So, I’m going to have to go with what works best for my body shape and height. I move them up and over, then back and find them too close to the centre line making them look asymmetrical. Back they go and now the muslin is ready.

Now it’s time to pick it apart, iron the pieces well and ensure that they are free from lint bits. I now have a pattern from muslin and it’s on to the exciting bit of cutting and marking real fabric!

Posted in Couture Sewing, Little Black (French) Jacket, sewing

A muslin/toile for my new Little French Jacket: Marking for perfect fit

coco quoteCoco Chanel is often quoted as having said, “Dress shabbily and they remember the dress; dress impeccably and they remember the woman.” And nothing says impeccable dressing to me more than perfect fit. Oh how I strive for perfect fit (as anyone who has read previous posts on this journey with me will know!). As I advance down the road toward Little French Jacket #3, I am faced squarely with fitting a new design rather than reusing an already fitted one. Of course this begins with the muslin.

When last we spoke I had done a preliminary pattern fitting, tweaked a few known problems, and then began cutting out the muslin to create my first test jacket – and with any luck and a few more tweaks, it will be the only one I’ll need.

In the Spring 2013 special fitting issue of Threads magazine Susan Khalje begins her article on creating a muslin by saying, “Muslin may be an inexpensive fabric, but a muslin test garment is worth its weight in gold.” And I wouldn’t even consider cutting into that expensive bouclé or that even more expensive silk charmeuse for the jacket lining before getting as close to a perfect fit for the pattern as I could possibly get. This is especially important in the case of these jackets because of the nature of the fabrics themselves. Both bouclé and silk charmeuse fray appallingly and the less they are manipulated the better. This means that there should be no seam ripping whatsoever. The only way to avoid redoing any seam in my view is to be absolutely certain that the pattern fits then baste everything before sewing. We’ll see how that goes.

Anyway, I now have my muslin fabric cut out and am ready to mark it. I am going to be marking and working with seam lines as I mentioned in my last post, rather than seam allowance edges, so the muslin pieces are pretty roughly cut out. Now I have to transfer all seam lines, grain lines and other markings onto the right side of the muslin pieces. The right side you ask? Well, this is what I asked after a lifetime of tailor’s tacks in good fabrics (I’ll get to those as well – wait and see) and piddly little pieces of carbon tracing paper sandwiched between two pieces of fabric to mark on the wrong side. I learned that approach in long-ago home ec. classes! With the couture approach to muslin creation, however, I need the markings on the right side so I can see them when I do the fitting in due course. Won’t I need some marks on the inside for sewing – well, yes, but I’ll get to that.

I’m using large sheets of dressmaker’s waxed marking paper that I bought online from Susan Khalje’s web site. When I started using it I thought, “Where have you been all my life?” I think each sheet (it comes in a tube of 4 sheets of different colours) measures about 26 inches X 39 inches.

IMG_2015
The sheets of the heavily waxed paper are enormous and wonderful to work with. But they do cause a bit of hand staining! (It comes off easily!)

I roll out the red sheet (I like red for my first pass on muslins) on my cutting board and hold it in place with random things on the four edges that will otherwise curl unmercifully. I have a tape dispenser on one, a pair of shears on another – well, you get the idea.

I place my first cut-out muslin piece on the tracing paper and just begin tracing all the marks with my tracing wheel. When I need to move the piece to be closer to me, I just move it. When I need to turn it, I just turn it. There is no rearranging of carbon paper etc. I’m in heaven. I mark everything in sight. Grain lines for sure, seam lines, darts, circles, notches, waistline, bicep line, high figure point etc. When I have all of this on one piece and I have carefully checked to ensure I haven’t missed any markings, I remove the tissue paper pattern, re-pin the two layers together and just turn it over. I use the markings on this side to mark the other side. Brilliant! I then take a red pen and label each piece: centre front, side front, upper sleeve etc. I repeat this process with every single piece. Because I’m a bit OCD about this process, I actually note which is the right side and which is the left for each piece and mark this as well.

IMG_1154
I’ve marked from one side, removed the tissue pattern, re-pinned and turned the piece over to use the initial markings to mark the other side. 

I need to say a few things about this pattern (Vogue 8804). It is Claire Shaeffer’s design for these LFJ’s and on the pattern pieces she has provided markings for the quilting lines. When made a LFJ before, I always made my own decisions regarding the location and spacing of the quilting lines based largely on the pattern woven into the fabric itself. However, I do note that since this one will have buttons and buttonholes, and the front will be underlined with silk organza which she specifically indicates should be quilted directly to the fashion fabric rather than doing this line through the lining, I do mark those quilting lines on the front pieces. I will leave out the back markings though, and make a decision and measure them when I get to the quilting part.Vogue 8804 pattern front

So I now have all the pieces marked on the right side, but I’ll be putting right sides together to sew up the toile, so how in the world do I get the marks I need on the wrong side? Thread tracing to the rescue.

I put all the tissue paper pattern pieces back in the envelope: I shouldn’t need those ever again as long as I live if I get this right. Then I take the muslin pieces to the machine. I thread it with red thread. (Remember, I like red for my first pass at a muslin then I know which marking I’m looking at.)

Using a 3.5 mm stitch length (it does go faster this way and there is less puckering), I sew along any line I will need to sew. This means I don’t thread-trace grain lines, waist markings etc. I don’t back-tack at all and I sew to the end of each line, stop, cut the thread, then sew the next one so that I have very clear transections of the seam lines. This should make it easier to match up the corners.


When this process is complete, I have a perfect set of wrong side sewing markings. I take all the pieces to the ironing board and give them a good steam press. I’m ready to sew the muslin together.

Using a 3.5 mm stitch length and dark grey thread to differentiate the stitching line from the thread tracing line, I whip it together. Well I whip it and carefully prepare and set in the sleeves to be honest. Once it’s complete, with great trepidation I put it on, approach the mirror, and hope that it comes close to fitting.