
 Whenever I see a fantastic jacket of any sort, I always wonder exactly what is underneath that beautifully finished exterior. What does it look like between the lining and the fabric? What precisely is it that keeps those edges straight? How is it that the sleeve cap is so perfect? Oh, I know all about underlining, seam finishing, sleeve setting and all the rest, but putting it all together to achieve a specific finish – well, that’s the thing. And that’s why the stabilizing and other aspects of what goes between what the world will see – the lovely bouclé – and what I will feel – the even lovelier silk charmeuse – is at the heart of my next step.
Everything is cut out and marked. Now I have to consider what will support that beautiful exterior. But before I can even get to that in its totality, I have to deal with the buttonholes. And this begins with stabilizing the fabric to support buttons and button holes, a step that I have not had to take previously.

The first thing I have to do is stabilize the front open edge (I’m also going to stabilize the front neck edge while I’m at it.). So, I use the silk organza selvage along the front and attach it as I have learned to do before: a slip stitch along the fold line and a catch-stitch to hold it down. Then I have to underline just the centre front of the jacket – centre front to the princess seam. Chanel-type jackets are meant to be soft and pliable with no firm interlining to stiffen it whatsoever, but when dealing with a buttoned up front, it needs a little something. I am using silk organza because after testing a few interfacings (which is what it’s called in the pattern, but given the construction technique, it’s really more of an interlining or underlining if you prefer) I decide that the silk organza changes the hand and drape of the fabric the least.

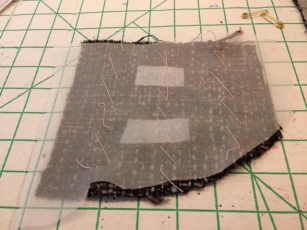
I cut it out roughly and lay it on the wrong side of each of the front pieces. I then baste it on with large diagonal stitch lines (and my Japanese basting thread!) to hold it in place. Then, following the instructions in the pattern (Vogue 8804), I machine quilt it to the boucle using a 35 mm stitch – I’ve already done several test pieces which are essential for me.
I have had to read the instructions for this at least four times, because it didn’t really make a lot of sense to me: normally, those machine quilting lines would be through the silk lining as well. But I do as I’m told here and later realize that it’s because the quilting line would have been too close to the front and the buttonholes. I also cut out little pieces of fusible interfacing and fuse them to the right front under where each buttonhole will be.


As I’ve mentioned ad nauseum previously, this jacket differs from my previous two in that it actually has buttons and buttonholes at the front and sleeve vents. And I’ve decided to do them the Chanel way: hand bound. Dear god! Have I lost my mind? Maybe. Anyway, I’m determined to give it a try. And I have to do it at this stage if I’m going to follow Claire Shaeffer’s instructions with Vogue 8804. The buttonholes are completed first and then a faux welt is done behind them where they will be hand-stitched to the lining.
I have my supplies at hand: I couldn’t get silk buttonhole thread so I’m using another suggested option, in this case a cotton button thread, beeswax and a gin and tonic. I review the online video I discovered to be the best instruction available – from The Yorkshire Tailor – prepare my samples to replicate exactly the fabric I’ll be doing it on (bouclé, fused interfacing pieces and silk organza underlining) and take a deep breath.
She makes it look so easy and tidy, right? And the stitches themselves are fairly easy. I’ve waxed my thread exactly as suggested in the video and I’m making my first sample buttonhole. It is hideous and I’m acutely aware that there is an expectation that one needs to complete 30 before really getting them right. Thirty? I do another. And another. And another. They are so hideous that I can’t even bring myself to take photos. This will not be happening. I am not a Chanel worker and this is not a Chanel jacket, after all. It is an homage and I want to be able to wear it. With my hand buttonholes, that would not be possible! But I need another plan of attack for those pesky buttonholes before I commit to completing the lining. (Maybe I’ll practice them over the winter!)
So, I get out my buttonhole attachment for my machine and prepare a few samples that also include the lining. I use silk thread in the bottom on the silk side and start experimenting. I have a lot of difficulty with getting them the right size because of how the fabric feeds (or does not feed) between the two pieces fo the buttonhole foot as it normally does. After removing the bottom plate and just letting it feed over the machine plate, I have a buttonhole I’ll be satisfied with. However, since it is also through the lining, I won’t be doing them until near the very end of the project.
At least I can move on. So I complete the stabilization of the neck and hem edges of the body (I’m completely avoiding the sleeves until I get to that point when I’ll stabilize, construct and quilt all at the same time.) I can sew a few seams and get ready for the fun part: quilting the silk to the bouclé!


You must be logged in to post a comment.